Decadent No-Bake Nanaimo Bars with Luscious Creamy Custard
Satisfy your sweet tooth with my No-Bake Nanaimo Bars with Creamy Custard! An easy, delicious Canadian treat that's perfect for any occasion.

- look into Into the Sweet Life: No-Bake Nanaimo Bars with Creamy Custard
- All About the Bars: A Sweet Overview
- Why You’ll Love these Bars
- Time to Gather Those Ingredients!
- Essential Ingredients Guide to No-Bake Nanaimo Bars with Creamy Custard
- Mastering Professional Cooking: A Fun Journey in the Kitchen
- look into into the Richness: No-Bake Nanaimo Bars with Creamy Custard
- Pro Tips & Secrets
- Perfect Presentation
- Storage & Make-Ahead
- Creative Variations
- Complete Nutrition Guide
- Wrap Up
- Frequently Asked Questions
- Recipe Card
look into Into the Sweet Life: No-Bake Nanaimo Bars with Creamy Custard
Alright, let me hit you with a little story. picture it: my first family gathering after moving to a new town.
I was nervous, hoping to impress everyone. thankfully, i brought along a pan of no-bake nanaimo bars with creamy custard.
They stole the show. people couldn't resist asking for the recipe, and i felt like a rock star. honestly, there’s something magical about these layered beauties—rich, creamy, and absolutely delightful!
Now, have you ever had a dessert that just screams celebration? that’s nanaimo bars for ya! bursting with canadian heritage, they’ve become a hit at bbqs, potlucks, and even winter holidays.
And let's be honest, they’re the ultimate no-bake dessert for anyone who’s not into turning the oven on, especially when it’s july and way too hot!
All About the Bars: A Sweet Overview
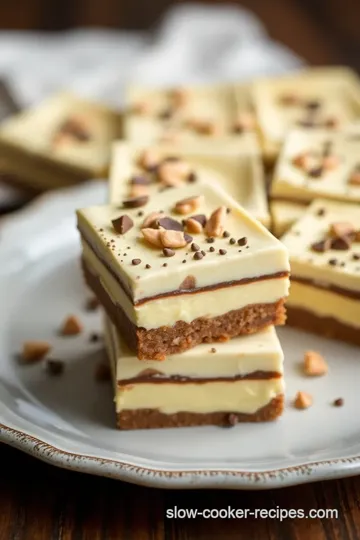
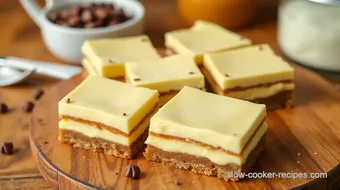
These bars originated from nanaimo, british columbia, and have been a beloved treat since the 1950s. who would’ve thought something so scrumptious could come from a little canadian city? they’re basically a tri-layer treat: a crunchy base, creamy custard layer, and a chocolate topping.
Sounds fancy, right? but trust me, they’re easy to whip up!
You’ll find that making these nanaimo bars requires only about 45 minutes —that’s prep and chill time included! the best part? you don't need to be a kitchen wizard.
Just combine, layer, and chill. as for cost, it’s pretty wallet-friendly, especially if you already have some of the staples kicking around in your pantry.
Why You’ll Love these Bars
Let’s talk about why you need to make these no-bake bars asap! first off, they pack a nutritional punch. some layers feature nuts, which can offer a little crunch and protein.
Plus, you can even swap in gluten-free ingredients if that’s your jam. who knew you could enjoy such decadent flavors without the guilt?
And let's not forget the versatility. whether it’s a summer picnic, a cozy holiday gathering, or just a tuesday pick-me-up, these bars are the perfect fit.
They’re just the right amount of sweet, and that custard layer? it’s like a hug for your taste buds!
Whether you're planning a birthday bash, a casual hangout, or just a quiet dessert night at home, these bars will shine.
Think of them as a secret weapon—guaranteed smiles when you share ‘em with family and friends.
Time to Gather Those Ingredients!
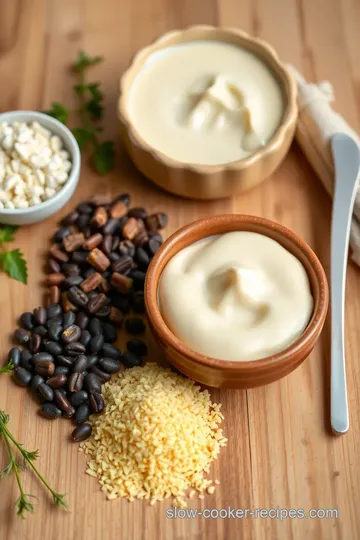
Now that you’re hooked, let's make sure you have everything on hand. first, you’ll need graham cracker crumbs, a bit of cocoa powder, some nuts, butter, and powdered sugar for that yummy base.
Then, for the creamy custard layer, get ready with heavy cream, vanilla extract, and a touch of instant pudding mix.
Finally, we’ll top it off with some semi-sweet chocolate and butter for that indulgent finish.
Sounds easy, right? let's roll up our sleeves and get cooking, or rather, assembling! time to dive into the ingredient list so you can create your own homemade nanaimo bars .
You're gonna love every creamy, chocolatey bite!
Essential Ingredients Guide to No-Bake Nanaimo Bars with Creamy Custard
Ah, nanaimo bars! just saying that brings back sweet memories. if you’ve ever tried them, you know how hard it is to resist those layers of goodness.
But before we dive into making those delicious no-bake nanaimo bars with creamy custard, let’s go over the essential ingredients you’ll need.
Trust me, understanding each component is key to whipping up these treats like a pro!
Premium Core Components
First up, let’s talk quality ingredients. Getting the right ones makes all the difference. Here’s what you’ll need:
- Graham cracker crumbs: About 1 cup (100g). Check your grocery store’s baking aisle. You want a brand that’s fresh for a perfect base.
- Unsweetened cocoa powder: Grab ¼ cup (25g). Look for a deep color; it tells you it’s rich and high-quality.
- Nuts: ½ cup (50g), finely chopped walnuts or almonds are super yummy. Make sure there’s no smell. Fresh nuts have a nice, nutty fragrance.
- Unsalted butter: ½ cup (113g), melted. Give it a little taste! If it’s salty, it ain’t right for this recipe.
- Powdered sugar: ½ cup (60g). It should feel soft and blend easily. Stale sugar will lead to a gritty texture in your Custard Layer.
Storage ideas? Keep nuts in the fridge to preserve freshness. Cocoa? A cool, dark place will do ya.
Signature Seasoning Blend
Now, this is where the magic happens. The creaminess of the custard layer needs to balance nicely with the chocolate topping.
- For the custard layer , we’re going with 1 cup (240ml) of heavy cream. Remember, the colder it is, the better it whips up into peaks.
- Add in 1 teaspoon of vanilla extract for that aromatically sweet lift that sends your senses soaring.
- And don’t forget about a tablespoon of instant vanilla pudding mix. It’s the secret to that smooth, creamy texture.
Feeling adventurous? Swap vanilla for something fun like almond extract. Go ahead and make it your own!
Smart Substitutions
What if you're missing an ingredient? No worries! Here are some common alternatives to rescue your baking:
- Graham crackers? Crushed digestive biscuits or cookies can step in just fine.
- Don’t have heavy cream? Coconut cream is an awesome dairy-free substitute!
- And hey, if you’re aiming for a nut-free zone, sunflower seeds can replace nuts in your base!
With these smart swaps, everyone can dive into these homemade Nanaimo Bars without stress.
Kitchen Equipment Essentials
You’ll need the right tools for a seamless experience while whipping these up. Here’s your must-have list :
- A 9-inch (23cm) square baking pan will help keep those layers intact.
- Mixing bowls are crucial; you’ll be using a couple of them, so grab a few!
- While an electric mixer isn’t absolutely necessary for the yummy custard layer, it sure helps get those soft peaks quickly.
To mix things up, use a rubber spatula or wooden spoon for easy stirring. and for melting chocolate, a microwaveable bowl is essential.
Just don’t forget to melt it in 30-second bursts or it could turn into a chocolate disaster!
Final Thoughts
Making no-bake nanaimo bars with creamy custard is an easy yet rewarding task. armed with the right ingredients and tools, you’ll create something so good it’ll have everyone asking for seconds.
And let’s face it—there’s something magical about no-bake recipes. they save time and are perfect for those hot summer days or when the oven just feels too much, right?
So, get ready because next, we’re diving into the step-by-step instructions to bring these delicious layers together! Trust me, you won't want to miss it.
Mastering Professional Cooking: A Fun Journey in the Kitchen
Cooking can be a magical experience, especially when you dodge that oven and embrace the wonders of no-bake desserts ! whether you’re whipping up some no-bake nanaimo bars with creamy custard or diving into other easy treats, there’s something special about the process.
Let’s unpack the professional cooking methods you need to know to nail those chill-worthy desserts!
Essential Preparation Steps
First things first! before you start mixing that custard, you need to prep. enter mise en place —it’s a fancy french term for having everything in its place.
Gather your ingredients: graham cracker crumbs, heavy cream, cocoa powder, you get the picture. keeping everything organized saves time and cuts down on mess, trust me!
Time management is also key! if you put those nanaimo bars in the fridge to chill while you clean up, you're killing two birds with one stone.
And, hey, don’t forget about safety—be careful with those sharp knives and melted chocolate. a little cut can turn a sweet baking day into a bummer real quick!
Step-by-Step Process
Let’s dive into how to make your No-Bake Bars shine. Here’s how to tackle it:
-
Prepare the Base :
- Mix graham cracker crumbs, chopped nuts, cocoa, melted butter, and powdered sugar in a bowl.
- Press it into a lined square pan—firmly, but don’t go crazy.
-
Craft the Custard Layer :
- Whip up that heavy cream. You’ll know it's ready when it forms soft peaks.
- Add in the sugar and vanilla; keep whipping until it's creamy.
- Fold in the pudding mix—this is where the magic happens!
-
Create the Chocolate Topping :
- Melt your chocolate and butter together in 30-second intervals. Stir after each round until smooth.
- Pour it over your custard layer and spread it evenly.
-
Chill and Serve :
- Let that bad boy chill for about 30 minutes or until it’s set.
- When ready, slicing them cleanly with a warm knife will give you those Instagram-worthy bars!
Expert Techniques
Now, here come the pro tips! first up: temperature control . that custard needs to be perfectly whipped—too much, and it becomes butter.
Too little, and it's loose. we’re aiming for just right! aim for that delicate balance—keep an eye on your timings.
Quality checkpoints are golden, too! taste as you go. if your chocolate topping needs a pinch of salt or extra sweetness, adjust it! and if something goes wrong, don’t panic.
If your custard isn’t thickening, try whipping a bit more. you can save it!
Success Strategies
You know what they say, “fail to prepare, prepare to fail.” avoid common mistakes like skipping the chilling time—let those bars set! you’ll thank yourself later when you’re sinking your teeth into that creamy goodness.
Quality assurance is all about your ingredients! Don’t skimp on chocolate—a good quality chocolate topping can take those Nanaimo Bars from “meh” to wow .
Oh, and consider make-ahead options. these bars last in the fridge for a few days, so whip it up when you have time and serve it later.
They’re perfect for no-bake christmas treats or a quick dessert idea for family gatherings!
Final Thoughts
So there you have it! from mastering that precise timing to navigating the world of cream filling recipes , you’ve got everything you need to create those delectable no-bake nanaimo bars with creamy custard .
They’ll wow your friends and give you major kitchen cred.
Now, if you're itching for more tips, tricks, and tidbits about easy layered desserts or other sweet cooking recipes, stay tuned for our last section: Additional Information ! Keep cooking and having fun in the kitchen!
look into into the Richness: No-Bake Nanaimo Bars with Creamy Custard
Oh my gosh, if you’ve never tried no-bake nanaimo bars with creamy custard , you are in for a treat! this classic canadian dessert is not just a mouthful to say, but each layered bite is a beautifully decadent experience.
We're talking about creamy custard, rich chocolate, and a crunchy base that comes together without ever turning on the oven.
Seriously, is there anything better than no-bake desserts? let's dive right into some pro tips and secrets to make these bars even more delightful!
Pro Tips & Secrets
First things first, let’s talk flavor enhancement . for the custard layer, don’t shy away from adding a splash of almond extract along with the vanilla.
It gives a nutty kick that really elevates the dessert. and if you want a time-saving technique , prep the custard while the base chills.
Talk about multitasking!
When it comes to assembling your layers, remember to pat down the base firmly . a well-pressed crust ensures that the bars hold together beautifully, making it easier to slice.
Speaking of slicing, use a sharp knife dipped in hot water for clean cuts. it makes a world of difference, trust me!
And don’t forget about presentation . Sprinkle some cocoa powder or crushed nuts on top of the chocolate while it’s still warm. It not only looks fancy but adds a scrumptious finish!
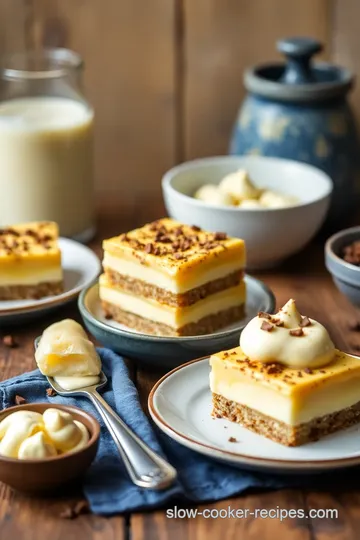
Perfect Presentation
Now, let’s chat about plating techniques . when you serve these bars, place them on a colorful plate that contrasts with the deep chocolate topping.
Think vibrant fruit or even a sprig of mint for that pop of color.
For a fun twist, consider adding fresh berries on top or on the side. Picture this: the luscious dark chocolate against the bright red strawberries. A winning combination, right?
Also, don't underestimate the power of garnish ! A light dusting of powdered sugar can make your no-bake bars feel extra special. Remember, we eat with our eyes first, folks!
Storage & Make-Ahead
If you’re like me and want to get a head start, these no-bake bars are perfect for make-ahead ! just store them in an airtight container in the fridge.
They’ll hold up for about 5-7 days, but trust me, they won’t last that long—they're too delicious!
When it comes to reheating, just leave them in the fridge. you want to enjoy those refreshing, chilled textures, especially during warm days.
If they start to wilt a bit, no worries—pop them in for a few minutes in the fridge for that fresh feel.
Creative Variations
Feeling adventurous? There are tons of creative variations for these bars!
- Seasonal twists : For a fall kick, add pumpkin spice to the custard layer or layer some spiced apples on top of the chocolate.
- Dietary modifications : You can easily make dairy-free Nanaimo Bars by swapping out heavy cream with coconut cream and using dairy-free chocolate.
- Flavor adaptations : Switch up the custard layer with lemon pudding for a zesty refreshment. It’s a whole new dessert altogether!
You can have fun experimenting with these easy no-bake treats !
Complete Nutrition Guide
Now, let’s talk about how these bars fit into your diet. each bar has around 250 calories , plus a good balance of fats, carbs, and a bit of protein.
They do have sugar, so it’s best to enjoy them in moderation. the nuts in the base provide healthy fats, too—score!
For portion guidance, cutting them into 12 bars keeps things friendly, but feel free to make them smaller if you’re serving a crowd.
Everyone will want a taste of that luscious custard filling !
Wrap Up
So there you have it! you’ve definitely got all the juicy details to make these no-bake nanaimo bars with creamy custard a hit at any gathering.
Whether it's a summer bbq or a cozy winter night, these bars are a delight that everyone will love. share the joy; you never know who will become a lifelong fan of this comforting, layered dessert! remember, cooking should be fun.
So, relax, create, and enjoy every bite of these easy layered desserts ! happy baking—oops, i mean, mixing!
Frequently Asked Questions
What are No-Bake Nanaimo Bars with Creamy Custard?
No-Bake Nanaimo Bars with Creamy Custard are a layered dessert consisting of a graham cracker and nut base, a rich custard filling, and a decadent chocolate topping. They are popular in Canada and offer a delicious combination of textures and flavors without the need for baking.
Can I make No-Bake Nanaimo Bars with Creamy Custard ahead of time?
Absolutely! These bars can be made a day or two in advance. Just ensure they are well-chilled in the refrigerator to set properly, which also enhances their flavors. Store them in an airtight container for the best freshness.
What can I use instead of nuts in the base?
If you're looking for a nut-free option, you can simply omit the nuts or substitute them with sunflower seeds or crushed oats for added texture. This ensures that everyone can enjoy the No-Bake Nanaimo Bars without worrying about allergies.
How do I store leftovers of No-Bake Nanaimo Bars with Creamy Custard?
Store leftover bars in an airtight container in the refrigerator for up to a week. For longer storage, you can freeze them. Just cut the bars, wrap them individually in plastic wrap, and place them in a freezer-safe container; they will keep for up to three months.
Can I substitute heavy cream in the custard layer?
Yes, heavy cream can be substituted with coconut cream for a dairy-free alternative, though this may alter the flavor slightly. You may also use whipped topping if you're looking for a lighter version, but keep in mind it may not be as rich and creamy.
Are there any variations I can try?
Definitely! You can add fresh fruit like berries on top for a refreshing twist, or mix cocoa into the custard layer for a chocolate version. Other variations include using different types of cookies for the base or adding flavor extracts to the custard for a unique taste.
Decadent No-Bake Nanaimo Bars with Luscious Creamy Custard Card
⚖️ Ingredients:
- 1 cup (100g) graham cracker crumbs
- ½ cup (50g) finely chopped walnuts or almonds
- ¼ cup (25g) unsweetened cocoa powder
- ½ cup (113g) unsalted butter, melted
- ½ cup (60g) powdered sugar
- 1 cup (240ml) heavy cream
- ½ cup (60g) powdered sugar
- 1 teaspoon vanilla extract
- 1 tablespoon instant vanilla pudding mix
- 4 ounces (113g) semi-sweet chocolate, chopped
- 2 tablespoons (28g) unsalted butter
🥄 Instructions:
- Step 1: In a mixing bowl, combine graham cracker crumbs, chopped walnuts, cocoa powder, melted butter, and powdered sugar.
- Step 2: Mix until fully combined and crumbly. Press the mixture firmly into the bottom of the lined baking pan to form an even layer.
- Step 3: In a separate bowl, whip the heavy cream until soft peaks form.
- Step 4: Gradually add the powdered sugar and vanilla extract, continuing to whip until well combined.
- Step 5: Gently fold in the instant vanilla pudding mix until smooth and creamy.
- Step 6: Spread the custard layer evenly over the base using a spatula.
- Step 7: In a microwaveable bowl, combine the chopped chocolate and butter. Melt in the microwave in 30-second intervals, stirring between each until smooth.
- Step 8: Pour the melted chocolate over the custard layer and spread evenly.
- Step 9: Refrigerate the assembled bars for at least 30 minutes or until set.
- Step 10: Cut into squares and serve chilled.
Previous Recipe: Easy & Juicy Cook Tuscan Chicken with Creamy Saffron: My Family Favorite
Next Recipe: Cozy & Easy Cook Homemade Chicken Noodle Comfort Food: A Family Favorite